Categories
passport photo Passport Photos

Passport Photo Rules For Babies/Children

Taking passport photos of babies and young children can be a challenging task. However, it is important to ensure that the photos meet the necessary requirements to avoid delays in the passport application process. In this article, we will discuss the passport photo rules for babies and children in the UK and provide some tips on how to take a good passport photo of your child.

Passport Photo Rules For Babies And Children In The UK

The rules for passport photos for babies and children in the UK are similar to those for adults. However, there are a few additional considerations that must be taken into account when taking photos of young children:

Age: Children must be at least one day old to have a passport.

Size: The photo must be 45mm high by 35mm wide, which is the same as for adults.

Head position: The child’s head must be facing forward, with their eyes open and looking at the camera. The head must be in the center of the photo, with the face filling 70-80% of the frame.

Background: The background of the photo must be plain and light-colored, with no patterns or shadows.

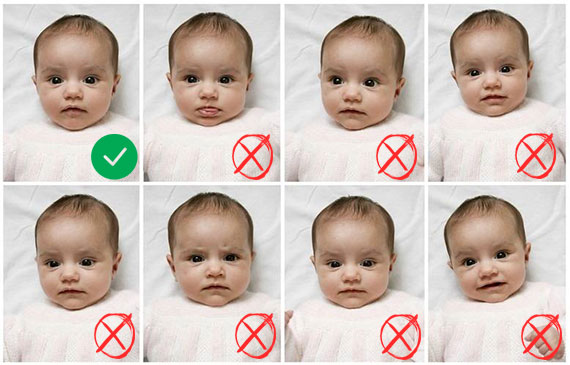
Expression: The child’s expression should be neutral, with their mouth closed and no smiling or frowning.

Glasses: Glasses can be worn in passport photos, but there must be no glare or reflection on the lenses, and the frames must not cover any part of the eyes.

Headwear: Headwear is not allowed in passport photos, except for religious or medical reasons. In these cases, the face must still be visible.
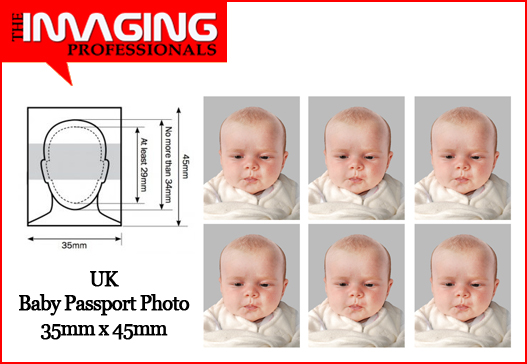
baby passport photo

Baby’s eyes: If the baby’s eyes are closed, their mouth must be closed too, or their expression must be neutral.

Tips For Taking Passport Photos Of Babies And Children

Taking a good passport photo of a baby or young child can be challenging, but the following tips can help:

Use natural light: Natural light is the best option for taking passport photos of babies and children. Avoid using a flash, as it can cause shadows and red-eye.

Use a plain background: Use a plain, light-colored background for the photo, with no patterns or shadows.

Keep the child calm: Try to keep the child calm and relaxed during the photo shoot. You can use toys or other distractions to keep their attention on the camera.

Avoid hats and headbands: Avoid using hats or headbands that cover the child’s head or face. If you must use headwear for religious or medical reasons, make sure that the face is still visible.

Ensure the child’s face is visible: The child’s face must be fully visible in the photo, with their eyes open and looking at the camera. If the child is very young and cannot support their head, you can lay them down on a white sheet or blanket and take the photo from above.

Take multiple shots: Take multiple shots of the child to ensure that you get at least one good photo that meets the requirements.

Conclusion

Taking passport photos of babies and young children can be a challenging task, but it is important to ensure that the photos meet the necessary requirements to avoid delays in the passport application process. When taking passport photos of babies and children, it is important to consider factors such as size, head position, background, expression, glasses, headwear, and the baby’s eyes. By following the above tips and guidelines, parents can take a good passport photo of their child that meets the necessary requirements.

Please visit our studio at 173a Walsgrave Road, Coventry CV2 4HH to get your baby passport photo taken by an experienced photographer.

The Imaging Professionals also offers VHS to DVD/USb conversion, 35mm Photo Slide Scanning, Picture Framing, and old Photo Restoration/Enlargement services.
Categories
Photo passport photo Passport Photos visa photos

The Most Effective Method To Make A 2×2 Photo – Complete Guide

A 2×2 Photo – Complete Guide

Need a 2×2 photo and where to begin? In the first place, you need solid programming. You need to set up your photo as indicated by the authority prerequisites. Continue to peruse this manual to get familiar with the picture determinations and find the simple-to-follow ventures for making an ideal photo. For help, visit The Imaging Professionals studio at 173a Walsgrave Road, Coventry CV2 4HH for 2×2 inch photos.

2×2 Photo Template And Requirements

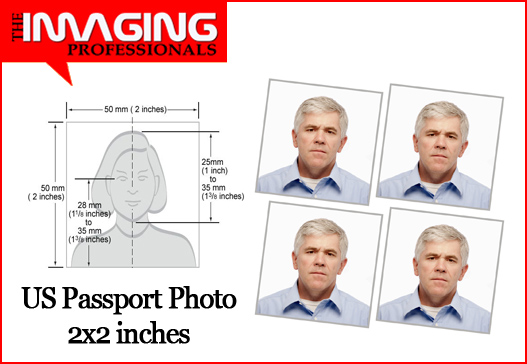
When making their own ID photo, individuals frequently request that how present in an image. Or on the other hand what number of pixels are a 2×2 photo? Look at the authority prerequisites for a 2×2 inches photo (appropriate for both a passport and visa):

•             Your photo should be in shading and printed on excellent paper.

•             Submit only a new picture (taken inside the most recent half-year) to mirror your current appearance.

•             Plain white or white-off foundation, with no example or items behind.

•             Full face is coordinated to the camera, only an unbiased look is satisfactory.

•             Eyes ought to be open and unmistakably visible. There should not be any shadows or hair across the face.

•             No headcovers like caps or cloak, no headphones, and comparable items on your head (aside from worn for strict reasons).

•             You can’t wear glasses (regardless of whether they don’t have coloured focal points).

•             Assuming you incline toward visual aides over writings and records, look at the models beneath. They represent the greater part of the necessities:

2x2 photo
US Visa Photo

Step By Step Instructions To Make A Photo 2×2

Concentrated every one of the necessities and prepared to make some move? Adhere to the Directions underneath and set up your 2×2 inches photo in under 5 minutes.

Stage 1. Pick Your 2×2 Photo Format

Most importantly, download passport photo Maker from the authority site. At the point when you’ve dispatched the product stay on the ID Type tab to peruse an assortment of implicit photo layouts. We should pick an appropriate format of the necessary size. For this situation, we’ll make a 2×2 passport photo so click US passport. On the right, you can see that the program uses the proper width and stature settings.

Stage 2. Yield Your Image To 2×2 Inches

How to trim a photo 2×2 inches? The passport picture should gauge precisely 2×2 inches, with the head size from 1 inch and 1 3/8 inches. The eyes ought to be put between 1/8 crawls to 1 3/8 creeps from the photo base. The app uses savvy face recognition innovation so you don’t need to stress over the right side of your head in the photo. In the event that the face acknowledgment module hasn’t worked properly, move the red and yellow lines to place the entire face into the center or physically change its proportion.

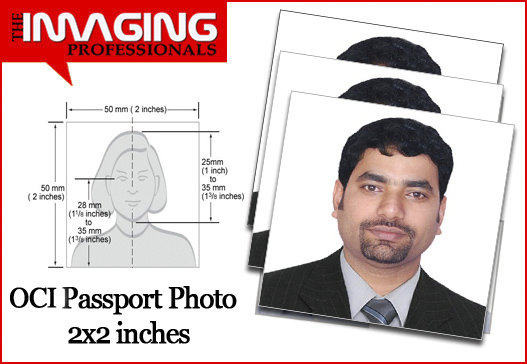
2x2 OCI Visa Photo
OCI Visa Photo

Stage 3. Change The Photo Foundation

Change to the Edit tab to make your image look as though it was taken by a professional photographer. Change the foundation tone to consummate white without influencing the face. Change features and shadows to get an unmistakable and sharp picture. Supplant garments to something more authority and formal in case you’re wearing a basic T-shirt in the image. In any case, be cautious with a lot of altering. After all the tweaking your ID photo should in any case look normal.

Stage 4. Print Your 2×2 Photo At Home

At this present time, it’s a high opportunity to print your 2×2 inches photo. Move to the print tab to pick the paper size and set the ideal number of duplicates. You can likewise add crop imprints to simpler cut out your printed photos. To get two US passport photos, pick 4×6 inches of paper and set the edges to fit all the photos on the page. Hit the print catch or save them as JPEG and add them to your online application.

Need a more point-by-point guide on the best way to make a 2×2 photo? Watch the video exercise underneath and rehash every one of the activities to get the best outcome:

Need to make different kinds of ID photos? With passport photo Maker programming, you can without much of a stretch plan proper pictures for the entirety of your family. The program accompanies many ID photo layouts for any reason and event, including child passport photos, DV Lottery pictures, Schengen visa photos, driver’s permit pictures and numerous different configurations. Begin with this ID photo manager and set aside your cash spent on photo administrations!

2x2 photo

Related Articles:

Categories
Photo

The Most Effective Method To Restore Old Photos Using Photoshop

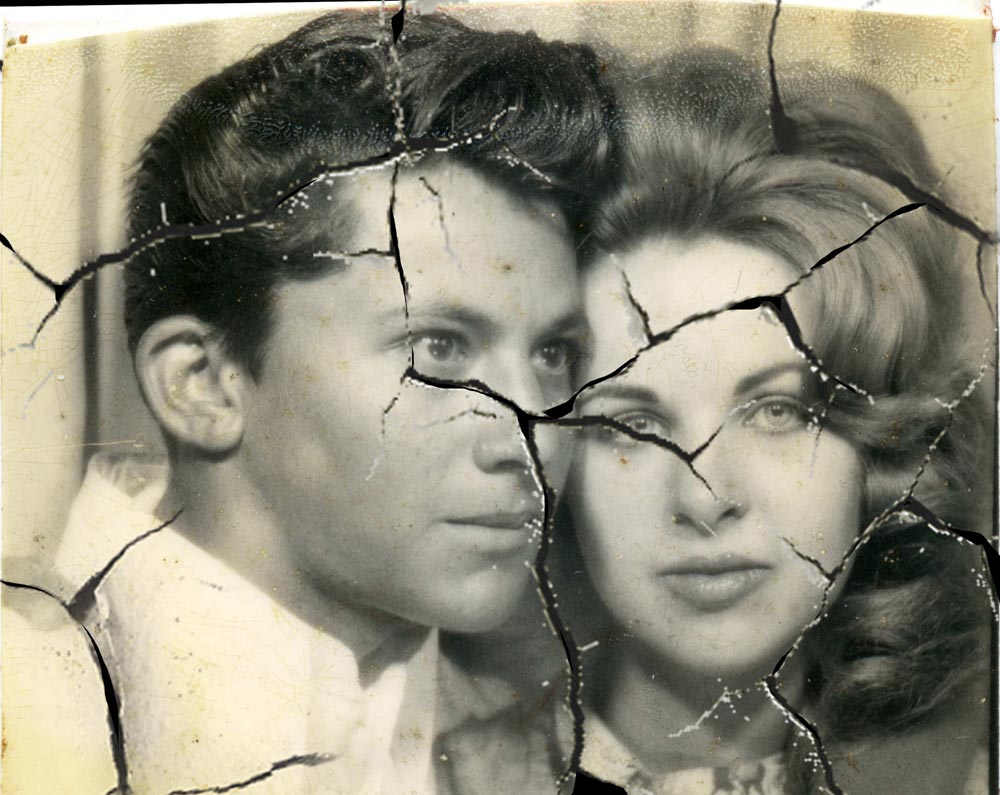
Back in the times of regular old film cameras, individuals didn’t have the advantage of saving all their pictures onto memory cards and upholding them on a PC. Back then, you needed to get the move of the film created, have the photographs printed, and hide them securely into photograph collections to guarantee that the recollections caught.

Lamentably, these printed photographs have a restricted life expectancy on the grounds that the nature of the photo paper and ink utilized wasn’t pretty much as great as the nature of what we use now. As the years passed by, crumbling would set in, leaving us with photograph collections and boxes loaded with old, harmed photographs with blurred ink, worn-out edges, and surprisingly a few scratches and stains to a great extent.

How To Restore Old Photos In Photoshop

To improve your old photographs, we’ve listed down a few steps you ought to follow. These steps apply to advanced photograph restoration utilizing the most recent form of Adobe Photoshop.

1.            Digitize your old photograph.

2.            Open the image in Photoshop.

3.            Crop, fix or turn the image.

4.            Review your photograph for any amendments you need to make.

5.            Make the vital changes in accordance with your image.

6.            Apply a channel to diminish commotion.

7.            Save the recently restored image.

1. Digitize Your Old Photograph

The first step is to scan the photograph to get an advanced duplicate. You can utilize a regular photograph scanner, snap a picture utilizing a computerized camera, or utilize a scanner application on your smartphone.

Whichever technique you use, ensure that it will yield a large, excellent duplicate of the photograph to make it simpler to work with.

2. Open The Image In Photoshop

Then, open the advanced image in Photoshop. Then, at that point make a second duplicate of the image. You’ll need to save a unique duplicate for reference, so you’ll be chipping away at adjusting the subsequent duplicate.

Instructions To Make A Copy Duplicate Of An Image In Photoshop:

•             Select a layer in the Layers board.

•             Drag the layer to the Create a New Layer button, or select the Duplicate Layer choice from the Layers menu or Layers board menu.

•             If you’ve chosen the Duplicate Layer choice, give your layer a name, and snap OK.

Remember to tap the eye symbol on the left half of your unique layer prior to chipping away at your photograph. Choosing the symbol conceals the layer from the board.

3. Harvest, Fix Or Turn The Image

Before you can start making any changes, ensure that you’re working with a clean, appropriately situated image.

In the event that there’s any undesirable void area (or any sort of room that shouldn’t be there) around the edges, you can essentially trim the entirety of that out.

Categories
Photo

Step By Step Instructions To Trim Your Image:

•             Click on the Crop symbol on the tool stash (on the left half of Photoshop’s default workspace).

•             Draw another editing region or drag the edges of the yield box to the ideal positions.

•             Press Enter (Windows) or Return (Mac OS) to trim the image.

You can likewise utilize the Crop menu to keep your image’s angle proportions relative, yet just in case you’re printing your old photograph.

In the event that the scan of your image is somewhat screwy, you can fix it utilizing the yield instrument.

The Most Effective Method To Fix A Slanted Image:

•             Click on the Crop symbol, then, at that point click the Straighten symbol on the toolbar.

•             Drag a line along with a level or vertical component in the photograph.

•             Let go of the mouse with the goal that Photoshop can pivot your image and harvest its lopsided edges.

•             Once you are fulfilled, press Enter. Photoshop will likewise eliminate the overabundance image on the off chance that you’ve empowered the Delete Cropped Pixels checkbox.

The Most Effective Method To Pivot Your Image:

Photoshop CC allows you to turn your image through its image Rotation setting or the Transform work in the Edit menu.

To Turn Your Image Utilizing The Image Rotation Alternative:

•             Click on the image in the taskbar.

•             Select image Rotation.

•             Choose your favored revolution.

To Turn Your Image Utilizing The Edit Menu:

•             Click on your image to choose it.

•             Click on the Edit menu, then, at that point pick Transform.

•             Choose your favored revolution.

4. Audit Your Photograph For Any Amendments You Need To Make

Evaluating the image you’re working on will assist you with choosing the changes or amendments that you need to make. Your ideal changes will rely upon your photograph’s present condition.

5. Make The Important Changes In Accordance With Your Image

There are two different ways to do this step in Photoshop: changing your image’s tone and fixing its harmed spots.

Make Shading Rectification Changes.

Old photographs are generally blurred, yet on the off chance that you need to improve the tone, shading, differentiation, and by and large dynamic quality of the photograph, Photoshop can do these, as well.

In the event that you select an image from the taskbar, you’ll see a drop-down menu that will basically give you all you require for some essential shading rectification. Under Adjustments, you’ll see three choices: Auto Tone, Auto Contrast, and Auto Color. Attempt these out first and check whether these programmed rectifications convey your ideal impact. If not, you can do these amendments physically.

It’s a smart thought to figure out how to peruse the histogram so you can make profoundly precise changes. From that point, select Adjustments and utilize the various capacities under this menu alternative. There are essential changes like Brightness, Contrast, exposure, and Vibrance, or the marginally more top to bottom change instruments like Curves and Levels.

Contingent upon the state of your photograph, the best thing to do is to mess with these diverse change instruments to get the right tone, shading, and differentiation.

On the off chance that your image has a shading projected, here are a couple of steps to follow to address the impact:

•             Highlight your copy layer, then, at that point click on the change layers symbol under the Layers board.

•             Choose Levels from the change layer choices.

•             To change your photograph’s RGB (red, green, and blue) levels, click on the committed tab. An RGB menu will show up.

•             Click on any of the shading choices, then, at that point carry the white and dark sliders to the histogram’s vertical line.

•             Once you’re finished changing the RGB levels, click on the Layers board to exit.

•             Highlight your copy layer and your change layer, then, at that point right snap on the space and select Merge Layers to consolidate the two layers.

Fix The Harmed Spots.

This part is the place where it gets somewhat precarious—you’ll need an eye for detail and a ton of tolerance! On the off chance that there are any scratches, stains, and other undesirable imprints on your photograph, you can utilize a couple of fledglings’ well-disposed spot remedy Photoshop apparatuses: the Spot Healing Brush, the Patch Tool, and the Clone Stamp.

•             Click on the Spot Healing Brush symbol (the one that appears as though a bandage) on the tool stash.

•             Choose your ideal brush size in the choices bar.

•             Choose between the Proximity Match, Create Texture, or Content-Aware Type choices. Any of these alternatives should work for what you’re attempting to accomplish.

•             Select or deselect the Sample All Layers alternative in the event that you need to test information from all layers or one dynamic layer.

•             Click on the spot you need to fix, or snap and drag the brush over blemishes in a larger region.

Categories
Photo

Resize The Images Without Losing Quality

Have you at any point had a go at resizing an image to make it larger? This generally results in loss of value where the enlarged image looks foggy and amateurish. As of late one of our clients inquired as to whether it was feasible to resize a little image and make it larger without losing quality. In this article, we will tell you the best way to resize images to make them larger without losing quality.

Why Images Lose Quality When Enlarged?

A bitmap is the most usually utilized image arrangement on the web. All your JPEG and PNG documents are Bitmap image records. A bitmap image is comprised of thousands of pixels. In the event that you zoom in, you can really consider those to be squares.

Every one of these pixels is planned to a fixed area on the image, subsequently the name Bitmap.

Most image-altering programming shrink or enlarge these pixels to resize an image. This is the reason when you resize an image to a more modest size there is no apparent quality misfortune. Essentially on the grounds that those pixels become even less apparent.

Then again when you resize an image to make it large, these enlarged pixels become more noticeable which makes the image look hazy and pixelated. Like this:

Please visit The Imaging Professionals at 173a Walsgrave Road, Coventry CV2 4HH for a professional photo enlargement and framing services or call 02476101687, 07585260889 to discuss your special requirements.

What’s The Solution?

The arrangement is to make up for each enlarged pixel, so it coordinates with the properties of its nearest pixel. This strategy is called fractal Interpolation or essentially fractals. It creates a vastly improved result when an image is enlarged utilizing this technique.

Here is the manner by which to utilize this strategy in most normal image-altering programming.

Strategy 1: Using Perfect Resize With Adobe Photoshop

Wonderful resize is a product that permits you to resize your images smartly. It is accessible as independent programming just as a module for Adobe Photoshop.

The regular rendition costs $50 and the top-notch adaptation which contains a module for Adobe photoshop costs $150. The two variants are additionally accessible for a free multi-day preliminary. In the event that you resize images on a regular premise, we prescribe you to go for Perfect resize. It is expensive, yet it is the most ideal approach to enlarge images.

Note: we are not a subsidiary with Perfect resize at all. We’re super glad clients of the item.

Subsequent to introducing the product, open the image document you need to resize in Photoshop. Just go to File » Automate and select Perfect resize.

This will open the image in the Perfect Size application. You can pick a preset from the left-hand menu or enter your own size in Document Size.

Subsequent to entering the record size, you need to go to File » Apply to save your progressions and apply them to the document in Photoshop.

Presently you can export this document by saving it as a web image.

That is all, your resized image will look much preferred now over the ordinary resize.

Technique 2: Using Free Software Gimp

Gimp is a free option in contrast to Adobe Photoshop. It can likewise be utilized to enlarge images with the least quality misfortune. Nonetheless, we ought to caution you that the result won’t be pretty much as great as Perfect resize.

Here is the manner by which to make little images larger in Gimp without losing quality.

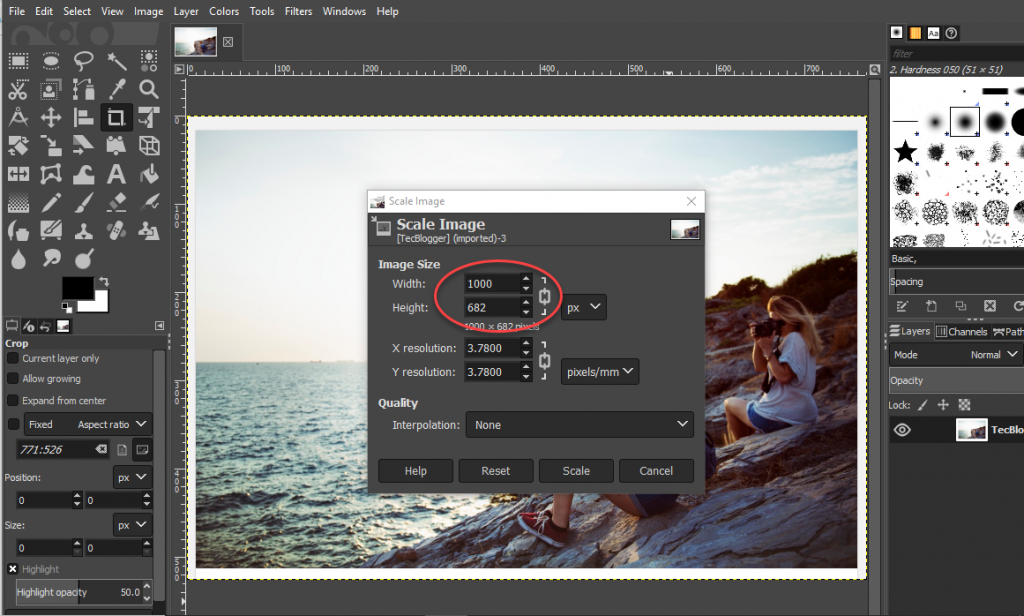
Open the image you need to resize in Gimp. Essentially go to image » scale image. Enter your ideal measurements. Under the Quality area pick Sinc (Lanczos3) as Interpolation strategy and snap on the scale image catch.

That is everything, you can now export this image for the web. Here is a model for you to think about. The image on the left was resized utilizing bicubic resampling in Photoshop. image on the right was resized utilizing Sinc (Lanczos3) as addition technique. You will see that there is almost no distinction in both images.

Categories
Photo

Step By Step Instructions To Make Scanned Photos Bigger

On the off chance that you scanned a photo and need to enlarge it for printing or investigation, you can utilize an image-altering program. An image-altering program expands the image’s size by numerically enlarging the pixels that make up your photograph while keeping up a similar viewpoint. Despite the fact that it is a straightforward cycle, know that critical enlargement may cause your photographs to seem foggy when you print them.

Step 1

Open up an image-altering application on your PC. On the off chance that you are utilizing Windows, your PC as of now has Microsoft Paint introduced. Then again, you can likewise download a free proofreader called GIMP.

Step 2

Open the scanned photograph by going to “Record” then, at that point “Open.” Find the scanned photograph that you wish to enlarge.

Step 3

Snap-on the “image” tab on the menu situated at the highest point of the window. Select “resize/Skew.” Type in a rate amount in the width and stature boxes. For example, entering “200%” in both boxes will make the photograph twice as big. Guarantee that you enter a similar rate for both width and tallness, in any case, the image will seem slanted.

Step 4

Save the enlarged photograph by tapping on the “Save” symbol or by going to “Record” again and choosing “Save As.” Type in a name for the document.

Step By Step Instructions To Print Five By Five Photos

printing 5-inch square photographs is a genuinely straightforward cycle in the event that you approach an image manager and photograph skilled printer. Square photographs can be helpful for unique activities, like montages, or for custom 5×5 photo frames. Since the print size isn’t large, 5×5 prints likewise give the alternative of utilizing low-resolution images from phones or more seasoned computerized cameras without a high danger of poor image quality.

Step 1

Open the photograph you need to chip away at in an image-altering program.

Step 2

Snap-on the “image Size” exchange, typically situated in the “image” menu. Type 300 in the crate close to “resolution.” If you are starting with a low-resolution image, type 200 in the container, or leave it at default. A high resolution improves the nature of the printed image. Snap “Alright.”

Step 3

Select the yield instrument. Hold the “Shift” key, then, at that point snap and drag the pointer across the image from the upper left to the base right. Holding the “Shift” key ensures an ideal square. Delivery the mouse catch when completed and press “Enter.”

Step 4

Open the “Image Size” discourse once more, and ensure “inches” are chosen in the tallness and width regions. Check the “oblige extents” box. Type “5” into the stature box. The width will be determined naturally. Snap “Alright.”

Step 5

Put photograph paper into your printer, and select “Record,” then, at that point “print.” Make sure photograph paper is chosen as the “Paper type” choice, and snap “Alright.”

How Can I Say Whether My Report Is A Scanned PDF?

There are two primary sorts of PDF archives – those that are made electronically utilizing PDF creation programming and those that are made from a scanner or other photograph imaging gear. PDF creation programming really assembles a PDF archive that has an inward construction, indicating characters, textual styles, and position – albeit the crude data looks bad to the natural eye. A scanned PDF is essentially a level image of a record – thus, scanning a page of text results in a picture of words being represented on the screen. To take data from this kind of scanned PDF, OCR technology is required so that each character can be optically perceived and afterward represented.

You can by and large outwardly decide whether an archive is a scanned record by enlarging the picture on your screen and taking a gander at the content. A scanned image will seem to have a lot less fortunate resolution, when taken a gander at intently, than an electronically made PDF record.

Notwithstanding, in the event that you are as yet uncertain whether your PDF record is scanned or local (electronic), you can simply open the document in Able2Extract. Then, at that point left snap with your mouse on the record and drag the mouse pointer over a certain space (as though you are attempting to choose a bit of the information).

In the event that the entire chose region gets featured (blue) – not line by line, however as a strong blue square shape – it implies that the record is scanned. Henceforth, you will require a Professional release of our application, as just the Professional version contains the OCR motor needed to change over scanned PDFs.

Then again, if just the content is featured – line by line, while the region in the middle isn’t featured – the report is a local (electronic) and you needn’t bother with the OCR to change over it.

Please visit our studio at 173a Walsgrave Road, Coventry CV2 4HH to get your small photo prints enlarged by an experienced photographer.

The Imaging Professionals also offers VHS to DVD/USb conversion, 35mm Photo Slide Scanning, Picture Framing, and old Photo Restoration/Enlargement services.
Categories
Photo Family Portraits passport photo Passport Photos visa photos

Instructions To Enlarge Old Photographs

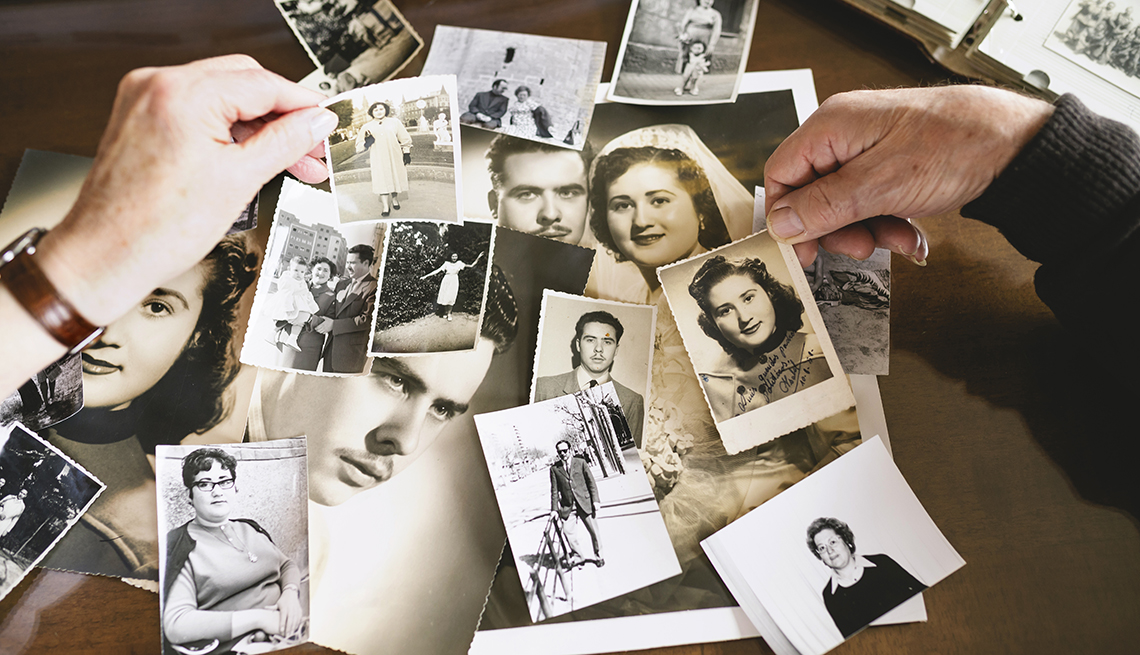
In the event that you have recently found some fabulous old photos in your loft or storage room, you’ll most likely need to make duplicates for family members, or enlargements to hang in your own home. Without a photograph’s unique negative, you can’t just reprint the image at a larger size. You can notwithstanding, make high-resolution enlargements from a printed version photo by scanning the image and printing an enlargement from the PC. On the off chance that you don’t possess your own scanner, don’t stress; many duplicate communities have scanners and PCs that you can use for a little charge.

Step 1

Turn on the PC and the scanner, and open the PC’s scanning or image-altering programming.

Step 2

Open the scanner and spot your old photo face down on the scanner glass.

Step 3

Go to the “Document” menu in the scanner or photograph altering programming and select “Import” and “From scanner.” You could possibly choose the specific name of the scanner effectively associated with the PC, for example, “Epson V500” or “HP Scanjet G4050.”

Step 4

Select the kind of archive you are scanning from the new scanning alternatives window. You will actually want to pick between “Shading picture,” “Highly contrasting picture” or “Text Document.”

Step 5

Select an ideal record design for the scanned image. You can presumably pick between JPEG (Joint Photographic Experts Group) configuration and TIF or TIFF (Tagged Image File) design. The TIF design turns out best for enlarging images; these documents are larger and can uphold more prominent detail and resolution than JPEG records.

Step 6

Select an ideal image resolution for the scanned image. You should indicate this resolution with a “dpi” number. “Dpi” means “dabs per inch,” which means the number of pixels per inch in the image. Select a dpi of at any rate 600. An image resolution of 600 dpi should deliver excellent enlargements from little unique photos.

Step 7

Snap “See” to see a preview scan of the image at your picked resolution. Change the photo’s arrangement on the scanning glass if the image seems abnormal. You can likewise choose a more explicit space of the picture to scan by making a container over the see scan utilizing your mouse.

Step 8

Snap “scan” to scan the image, and save the document.

Step 9

print the image at home in the event that you have a great printer, or save the image document to a CD or glimmer drive and take it to a duplicate place for printing.

Have Adobe Photoshop on your PC? That changes things only a tad. You actually will not have the option to (and presumably shouldn’t) enlarge your image to intense extents, yet the quality will be better in the event that you follow these steps:

1.            Open your image in Photoshop.

2.            Go to the image Size discourse, check to resample, and select “Preserve Details” in the corresponding dropdown menu.

3.            Make sure the resolution is set to 300 Pixels/Inch.

4.            Set Width and Height to inches and conform to enlarge your image. (Keep in mind, you presumably don’t have any desire to go past double the size of your unique image!)

5.            Save the now enlarged image as a “Smart Object” on the off chance that you haven’t as of now.

6.            Duplicate the layer and set the mix mode to “delicate light.”

7.            Apply a “High Pass” channel.

8.            Create an improved edge by changing the see. (This will take a couple of attempts to dial in!)

With a feeling of how big you can go close by, it’s an ideal opportunity to think about a portion of the kinds of photo prints. Our Large Format prints pair giclée print quality with chronicled paper for consistent with life preservation of those larger-than-life minutes.

Please visit The Imaging Professionals studio at 173a Walsgrave Road, Coventry CV2 4HH for bespoke photo enlargement and framing services or call +442476101687, +447585260889 to discuss your requirements.

The Imaging Professionals also offers VHS to DVD/USb conversion, 35mm Photo Slide Scanning, Picture Framing, and old Photo Restoration/Enlargement services.
Categories
Photo

The Art Of Mounting And Framing Photos

An incredible picture has the right to be noticeably shown. framing and mounting are the instruments you need to make your best photographs sparkle.

There’s a whole other world to mounting pictures than simply show, notwithstanding. The right mounting techniques protect your art from acidic conditions noticeable all around and from the divider on which the picture is hanging.

There are a few techniques utilized for mounting pictures, every one of which utilizes their own materials and have diverse last results. The best mounting decision for every photograph relies upon the significance of the photograph, how it is printed, and the ideal presentation choices.

Knowing the diverse techniques – and understanding their advantages and disadvantages – will give you more alternatives when you need to mount your work for the show.

Why You Should Mount Your Own Photos

mounting photographs and framing them well gives the photographic artist a lot more showcase choices than basically utilizing essential frames. A very much planned mix of frame, mount, and mat structures part of the visual expression of a showed photograph, isolating it from its environmental factors and giving it more visual weight.

You can have your photographs mounted expertly, yet it’s a smart thought to figure out how to do it without anyone else’s help. When you have the right materials and apparatuses, it’s less expensive than re-appropriating the work to another person.

As a matter of first importance, you need to see some technical terms to explore the art of showing photographs and framed art well. There’s considerably more to it than stuffing a photograph in a frame and staying it on a nail in the divider.

You can broaden your innovativeness into the presentation of your photographs by attempting distinctive frames, mats, and blends to perceive what they mean for the sensation of your photographs when shown.

Mounting Versus Framing

mounting and framing are independent steps that can be utilized together for an incredible photograph show.

Photographs printed on paper will consistently be inclined to twisting or clasping. mounting expects to forestall this and give photographs a strong reason for the show by fixing them to firm support. A mounted photograph can be all the more handily took care of formatting and framing with less danger of harming the print.

mounting and matting likewise give photographic artists more alternatives with regards to frame sizes. Instead of being compelled to make a photograph fit standard frame measurements or being restricted to standard frame sizes for divider show, a mounted photograph can be embedded into a lot larger frame – or a frame of non-standard measurements – by slicing the mounting board to fit the frame.

Mounting Techniques

The strategy and materials utilized for mounting photographs rely upon various variables, including photograph attributes, accessible instruments and materials, cost, and comfort.

Protection mounting techniques try to protect photographs from any harm and preserve them for an extensive stretch of time. Most photographs shouldn’t be mounted and framed utilizing the strictest protection rules yet knowing the alternatives for preservation mounting and framing can help you protect photographs of an incredible individual or expert significance.

Photographs that are just required for transient presentation or that can without much of a stretch be reprinted for the show can exploit faster, less-expensive mounting techniques.

Dry Mounting

dry mounting appends the artwork to inflexible or semi-unbending support. It is intended to be utilized with photographs, posters, and water-touchy artwork. This strategy is infrequently utilized with fine art.

One of the numerous ways that dry mounting can be refined is by utilizing a warmth press to join the artwork or image to a support board. Be that as it may, the warm press strategy can harm artistic creations. A vacuum press can likewise be utilized in a similar way yet without the warmth.

Preservation Mounting

Preservation mounting utilizes a corrosive free mount board just as pivots and corrosive free tape or cement intended to hold corrosive back from breaking through to the artwork. Another name for preservation mounting is gallery mounting. This technique is utilized by most galleries. Now and again, corrosive free corners can be utilized to offer another degree of protection to the artwork.

Pressure-Sensitive (Adhesive) Mounting

A less expensive interaction that is similar in nature to dry mounting is pressure-delicate mounting. It doesn’t need warming or exceptional gear that can harm the photo.

This interaction utilizes items, for example, Perfect mount from Crescent, which has a unique glue that doesn’t initiate until you apply pressure to the photo.

Whenever you have taken out the protective paper from the glue and have situated your photo in the manner in which you need it, essentially apply pressure and the photo is fixed set up. Make a point to utilize the protective paper from the glue while applying pressure to protect the photo.

Wet Mounting Technique

On the off chance that you don’t really want to utilize pressure mounting however need to abstain from utilizing heat, wet mounting is ideal for you. Wet paste or paste is applied to the mount board before the photo is set up.

Utilize a piece of glass or some other strong surface to apply pressure to the photo as you hang tight for the paste to dry, which could take somewhere in the range of four hours to 24 hours.

Splash Adhesive Mounting

In the event that you are searching for a cleaner choice for wet mounting, you can utilize splash cement. Just spot the photo topsy turvy and splash the cement onto it.

You need to make certain to splash the sides, tops, and base edges of the photo before you position it onto the mount board. Once in position, you can smooth down the edges cautiously utilizing your hand.

Please visit The Imaging Professionals studio at 173a Walsgrave Road, Coventry CV2 4HH for bespoke photo printing and framing services or call +442476101687, +447585260889 to discuss your requirements.

Related Articles

Categories
Photo Studio Photography

What Is Mounting On A-Frame?

Photographic prints that will be held tight in a divider or set in a portfolio can appear in an assortment of ways. prints can be managed and afterward attached to the divider or set in a case or portfolio. This immediate style of presentation places accentuation on the print as a piece of paper and an image to be imparted instead of as a Work of art. mounting, matting, or framing the print requests that the watcher thinks about the image more as an article and as a considerable artwork. A support board, window boundary, or sheet of glass gives the image weight, significance (in that it should be protected from clasping, exposure to light and soil), and characterized edges. Utilizing all recorded, corrosive-free materials (i.e., mounting and mat sheets, tapes, and glues), protects the artworks from exposure to foreign substances that would cause staining or crumbling. This is alluded to as preservation framing.

Mounting

To protect your photo from bowing or wrinkling, to set it up for framing, or to keep it solid while holding tight the divider, it is important to mount your photo on inflexible support. mounting infers sticking a print to a backboard. There are three principal techniques: 1) the print is totally clung to the board utilizing the dry-mount cycle, 2) the print is held set up on the board with photograph corners, and 3) the print is held into place at focuses with pivot mounts. In the event that you decide to mount the photo to a backboard without a window mat, then, at that point, the print ought to be connected so that the cement doesn’t show (for instance, with dry-mount tissue or collapsed pivots.)

The dry-mount interaction stays a typical technique for sticking photos to sponsorship since it is inexpensive, simple, and rich. The cycle utilizes heat-initiated cement tissue sandwiched between the photo and a firm support board. A dry-mounted photo can be drain mounted, that is, can reach out to the board’s edges or may rest inside the spatial boundary of a larger board. This cement technique functions admirably for fiber, RC, and advanced prints, whether or not the photo is to be tangled or framed or to remain solitary with the support.

Matting

A front or window mat is a piece of board with a pattern window, through which the photo is seen. The print is mounted to the backboard and the window and back sheets are pivoted along with the paper tape.

The mat’s boundary around the image, regularly white, isolate the image from its general climate, giving a spotless, seeing field, liberated from interruption. A window mat can specifically show the photo: the window can open onto just part of the photograph, along these lines trimming the image while leaving the photo entirety. Then again, you can show segments of a photo’s printed lines under a window mat or buoy the photo by exposing the print’s edges inside the window of the mat utilizing a pivot mount.

At the point when utilized in a frame, the mat holds the photo back from contacting – and sticking to – the frame’s glass. In contrast to other presentation techniques, matting should be possible totally with documented materials and it is effectively switched (i.e.: tangled photos can be eliminated from their presentation materials clean). Another benefit of the window mat is that – in the event that a photo is taken care of every now and again, similarly as with a portfolio for private review – watchers contact the mat instead of the photo.

Framing Styles

All framing styles fall into three principal classes: tangled, matless, and drift mounted. Whichever style you pick, be certain that your photo doesn’t contact the glass once it is mounted and set in the frame.

Tangled Framing

In the most well-known framing style, front and back mats and pivot or photograph corners keep the photo straightened while the front mat holds the photograph back from contacting the glass. Tangled framing makes it simple to move an archivally tangled artwork into and out of the frame.

Matless Framing

Matless photos can be appeared with or without a line. On the off chance that a line is attractive, it very well may be given by the backboard or by the photo’s printed boundaries.

Regardless of the numerous benefits of matting, some contemporary photographic artists decide not to mat their artwork. One basic explanation is that recorded matting materials are expensive. Additionally, window mats give their encased photos the moderate tasteful – or air – of the art historical center: a tangled photo appears to play to sullen artistic customs, though unmatted or unframed photos – particularly those showed with no boundary at all – address the unassuming stylish of the preview or to the expansiveness (if the print is large) of an extended yet unframed material. Numerous contemporary picture takers frame their artwork with no boundary, which underscores the image instead of the framing. For this situation, the edges of the photo run that full distance to the edge of the backboard, giving the image more visual space. Borderless framing is here and there called drain mounting on the grounds that the print hurries to the edge of the board. Matless prints can be dry-mounted ready or front-mounted to plexiglass.

For a formal, protected tasteful, mount the photos in the focal point of the sponsorship with a close uniform boundary right around: normal rules are to mount with 3 to 5-inch borders with the image balance about ½ inch above focus. For a mounted stylish that feels formal yet unmistakable, you can change the separating and vertical centeredness of the image: take a stab at mounting even images close to the highest point of upward situated matboard, or the other way around. Obviously, before you mount the images, move them around the matboard to figure out what extents will look best.

Please visit The Imaging Professionals studio at 173a Walsgrave Road, Coventry CV2 4HH for bespoke photo printing and framing services or call 02476101687, 07585260889 to discuss your requirements.

Categories
Photo id photos Passport Photos Studio Photography visa photos

Top 10 Passport Photo Studios in Coventry

Besides being taught by online writers on how to make your own passport photos at home, we have put together list of passport photo studios in Coventry where you can have an ID Photos , Visa Photos and Passport Photos taken. In no particular order, the following are places we have researched and identified to be right passport photo studios to have passport and visa photos made.

The Imaging Professionals.

Passport Photo Studio for better passport photos service in Coventry. Be it ID or Visa Photos needed for travel document, India Life Visa Photo or OCI application, UK, EU, US Visa Photos, The Imaging Professionals is capable to get you the exact photos needed.

Passport photo is taken by experienced photographer inside a controlled lighting photographic studio. Free parking spaces on nearby streets and photos are ready within 3-5minutes.  No appointment is necessary, walk in customers are welcome. Get in touch with The Imaging Professionals on +442476101687  +447585260889 or visit the studio at 173a Walsgrave Road, Coventry CV2 4HH

passport photo studio

Passport Photos and International Visa Photographs | PASSPORT …

UK Passport Photo and International Visa Size Photos taken in Modern Coventry Photography Studio. PASSPORT, VISA ,DRIVING, MOBILITY and ID photos.


Focus Photography| Professional| Photographer| Photography …

Studio based Photographer in Coventry and Warwick. Specialist in Portrait and Wedding photography, as well as passport photos.


Passport Photo Service

Passport Photo Service was started in 1953 and has been a family-operated business to this day. Over the years, many famous personalities have been .


Family & Children Portraiture plus Baby Passport Photo Services in …

Family & Children Portraiture plus Baby Passport Photo Services. Warwick, Coventry and Leamington Spa. Location: Squire & Squire Photography.


RSS
Follow by Email
Twitter
Visit Us
Tweet